
Mastering React Native Paper: A Practical Guide


Getting into React Native app development? Then buckle up, because crafting a slick, consistent UI can feel like a wild ride! One minute, you are tweaking styles, and the next, you’re drowning in component props. But hey, don’t panic.
The React Native ecosystem has your back with libraries like React Native Paper, which packs a full set of Material Design awesomeness to keep your user interface game strong. It’s smooth and flexible and can craft an awesome app with a polished, modern, and professional look.
Whether you’re just starting with React Native or an experienced developer seeking to optimize your workflow, this guide will equip you with the knowledge to implement React Native Paper effectively.
Table Of Contents
We’ll break down the ins and outs of React Native Paper, including its best features like typography, elevation, dark mode support, and easy-to-use components like buttons, dialogs, and text inputs. We’ll also compare it with another popular UI library (React Native Elements) to help you figure out when Paper is the right tool for the job (and when it isn’t). So, let’s dive in!
Why Choose React Native Paper
Pre-built, Customizable Components
Now, let’s talk about React Native Paper — easily one of the best UI kits for React Native apps.
Imagine building a beautiful app without designing every button, card, or dialog from scratch. That’s exactly what Paper does. It gives you ready-to-use components like Buttons, Cards, Text Inputs, Chips, Dialogs, and Snackbars — all built-in.
The best part? Everything follows Material Design, Google’s design system for clean, modern, and easy-to-use interfaces. Material Design means simple icons, smooth animations, and the same polished look on both iOS and Android. So, with Paper, you’re not just getting components, you’re getting a pro-level design system, right out of the box.
Consistency Across Platforms
One big win with React Native Paper is consistent design on both Android and iOS. No need to adjust layouts or styles for each platform. Paper handles that for you. Your app looks and works the same everywhere saving you time and headaches.
Easy Theming and Integration with React Native Projects
With React Native Paper, the theming is super easy. You can tweak colors, fonts, and more to match your brand. It also fits right into any React Native project whether it’s new or already in progress. Simple setup, big impact.
Here’s a quick rundown of the most popular functions and components in React Native Paper:
Button – A customizable button component for all your app’s interactive needs.
Card – Create neat containers for your content, with customizable sections for images, text, and actions.
Dialog – A component to show modal alerts and confirmations.
TextInput – A flexible input field for user text, perfect for forms.
Snackbar – Display short messages to users at the bottom of the screen.
Appbar – A sleek top bar for navigation and actions.
List – Display lists of items with flexible layouts.
Chips – Small interactive elements for tagging, filtering, and input.
FAB (Floating Action Button) – A fun, customizable button that floats above content.
Checkbox – A simple way to create checkboxes in forms or settings.
Get Started with a React Native Paper Example Project
Let’s walk through the basic steps to set up Paper in your React Native project.
Setting up a React Native project:
If you haven’t already, install React Native using
1npx react-native init MyApp
Navigate to your project folder: cd MyApp
Installing and Configuring React Native Paper:
Install React Native Paper via npm:
1npm install react-native-paper
Make sure your app is linked with React Native Paper by adding the necessary configurations to App.js.
Example: Implementing a Simple App with Common UI Components:
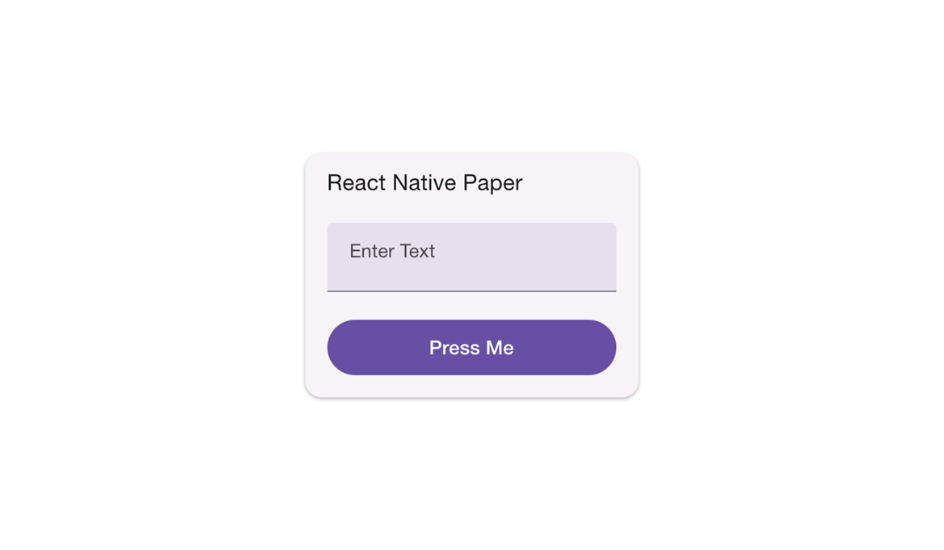
Here’s an example of a simple app with React Native Paper’s Button, Card, and TextInput components.
1import * as React from 'react';2import { View, Text } from 'react-native';3import { Button, Card, TextInput } from 'react-native-paper';45export default function App() {6 return (7 <View style={{ flex: 1, justifyContent: 'center', alignItems: 'center' }}>8 <Card>9 <Card.Title title="React Native Paper" />10 <Card.Content>11 <TextInput label="Enter Text" />12 <Button mode="contained" onPress={() => alert('Button Pressed')}>Press Me</Button>13 </Card.Content>14 </Card>15 </View>16 );17}
Code for Component Theming and Customization
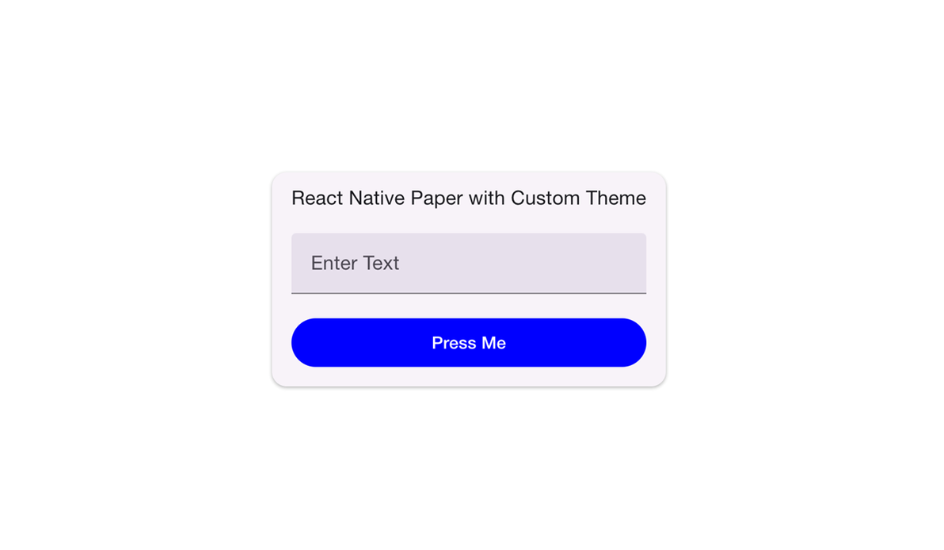
To customize the theme of your React Native Paper components, you can use the Provider component, which allows you to override default styles.
1import { Provider, DefaultTheme } from 'react-native-paper';23const theme = {4 ...DefaultTheme,5 colors: {6 ...DefaultTheme.colors,7 primary: 'blue',8 accent: 'orange',9 },10};1112export default function App() {13 return (14 <Provider theme={theme}>15 <YourApp />16 </Provider>17 );18}
Typical Errors and Solutions
Error: Unable to find component: Button
Solution: Ensure you have installed react-native-paper and linked it properly.
Error: Theming does not apply properly
Solution: Ensure that you are wrapping your app with the Provider component for theme customization.
React Native Paper vs React Native Elements
React Native Elements is another popular UI library for React Native that provides a large selection of components. It’s more flexible in terms of customization and can be used in any React Native project. However, it does not strictly adhere to Material Design principles like React Native Paper.
Similarities
Component-Based: Both libraries offer reusable, modular components for faster UI development.
Cross-Platform: Both support iOS and Android for a consistent mobile experience.
Customizable: Both libraries allow customization, with React Native Elements being more flexible.
Active Community: Both libraries have strong community support and resources.
Mobile Optimization: Both libraries are designed for optimal mobile performance.
Differences:
Material Design vs. General Design Flexibility:
- React Native Paper is tailored to follow Material Design principles, ensuring a cohesive look and feel.
- React Native Elements offers more general design flexibility but may require additional configuration for native mobile design consistency.
Performance Considerations:
- React Native Paper is optimized for Material Design and React Native, resulting in smoother performance and a more consistent experience.
- React Native Elements is a bit heavier, with more configuration required to optimize performance.
Ease of Use:
- React Native Paper is excellent for developers who need a fast, out-of-the-box solution with pre-styled components.
- React Native Elements is more suitable for teams that need flexibility in design and are comfortable with more customization.

React Native Paper: When to Use It and When to Avoid It
When to Use React Native Paper:
- Projects that require strict adherence to Material Design.
- Rapid prototyping where you need consistent and quick UI implementation.
- Lightweight projects that benefit from easy-to-use, pre-built components.
When Not to Use React Native Paper:
- If your project requires highly customized UI components.
- For more complex business-level applications where deep styling changes and custom layouts are needed.
Advanced Features and Performance Optimization
Integrating React Native Paper with State Management Libraries
Every real app needs some way to manage state. React Native Paper works smoothly with tools like Redux, Context API, or even newer options like Zustand to support handling forms or switching between light and dark mode and saving user settings.
The best part? Paper’s components are easy to control. You don’t have to rely on their default behavior. Instead, you can link things like dialog visibility or snackbars directly to your state. That way, your logic stays in one place, and your UI just listens.
For example, if you’re using Context to manage themes, you can pass your colors straight into Paper’s theme system. The whole app updates instantly — no extra work.
Pro Tip: You can also customize Paper’s theme to match your app’s brand. Want to add your company’s color? No problem. Need a special font? Easy. Paper gives you a solid base, but you’re always in control.
Performance Hacks & Tricks
Here’s how you stay on the sunny side:

How Does React Native Paper Compare to Other UI Libraries?
Here’s a comparison table to break down performance and optimization quirks when using React Native Paper vs React Native Elements vs Vanilla Components (your own custom stuff):

Final Thoughts
Mastering React Native Paper is more than simply adding another UI library to your toolset; it will make coding more efficient, thanks to its pre-built components, simple theming, and easy integration. Whether you’re creating slick buttons, smart cards, or theme-able interfaces, React Native Paper makes the entire process easier, saving you time and headaches while maintaining consistency across platforms.
That said, the right tool always depends on your project’s needs. Understanding your specific use case, performance constraints, and customization requirements is important. If your project demands highly customized styles or more flexible design systems, alternatives like React native Elements might be worth exploring. However, if you need a quick, polished, and Material Design-friendly UI solution, React Native Paper is a no-brainer.